


I've been intending to make a "How To Distress Furniture" tutorial forever, and I finally got around to it! Though I love making video tutorials, this one would have required a LOT of talking, and I (like most people I know) am not too crazy about the sound of my own voice. Listening to myself talking over and over while editing it may have driven me to insanity, so I've opted to make this one a readable tutorial.
Anyway, let's get started! First you'll need to assemble your supplies:


Anyway, let's get started! First you'll need to assemble your supplies:

- Sandpaper - 100 grit
- Sandpaper - 220 grit
- Sandpaper-holder-thing (optional but oh-so-helpful)

- a piece of furniture to distress: preferably a piece that is made of real wood, and painted without much gloss.
quick side note: if you've freshly painted the piece of furniture, make sure it is TOTALLY dry. I would give it at least two days between painting it and distressing it, or else you won't get an authentic-looking result as the paint will just sort of scrape off.
Now start sanding!

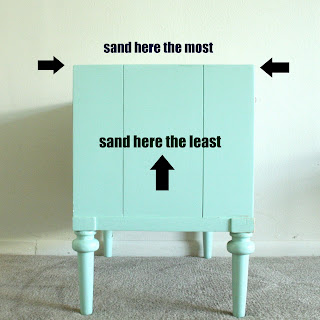
1. Take your 100 grit paper and start working on the corners and edges, where furniture naturally gets the most wear-and-tear over the years. For the less square parts, such as these round little legs, it's not quite so cut-and-dry. I usually pick a few random spots to really sand all the paint away, and pay extra attention to the widest part of the curves, where the furniture would likely get scuffed most often.
The 100 grit paper will get most of the paint off with just a few scrapes, but it will leave you with these ugly scratch-marks, which brings us to ....

2. The 220 grit! This will smooth out the scratchy look and make your furniture look more naturally worn. Start where you started in step #1, going over the corners and edges, extending out the sanded-ness (my new word I just invented) towards the middle, sanding less and less thoroughly as you work your way towards the middle of the area you're working on.

3. This next step is so important that I'm putting it in bold! Sand the ENTIRE piece of furniture with the 220 grit. Even the places that you don't want to be "distressed". I always think it's kind of funny when I see "shabby chic" furniture where the piece has been painted in a pretty, glossy paint and then randomly sanded here and there, while the rest of the piece is left sparkly clean and freshly-painted. It looks strange and fake! The point is to make the piece look old, worn and ... loved? I was going to say abused, but "loved" sounds nicer;)

This poor little hutch. I really got carried away with my sandpaper. I was feeling inspired by this heavily-distressed chair from design*sponge:

But I think I took it too far. Oh well, that hutch will always be one of my favorite pieces of furniture in the house, no matter how much I torture it.

I hope that was helpful! It really is so simple and very hard to mess up, unless you tend to get carried away like I do;)
Oh! And see the chair that the supplies are sitting in, up there in the very first picture? That's a little sneak preview of a super fun before-and-after I'll be posting tomorrow!


Great post I love distressed furniture and your looks fantastic!
ReplyDeleteI was thinking of doing a chair for my room and your image of the White chair has given me some ideas so thanks so much for sharing!
Abigail x
www.abigailsplace8.blogspot.com
P.S you have a lovely blog
I love it! What a cute hutch and I really like the color.
ReplyDeleteThat hutch is supa dupa cute! I don't think you went too far at all.
ReplyDelete