


If any of you readers out there are professional upholsterers, you'll probably be shaking your head at this tutorial and thinking I have no idea what I'm talking about. Well, you're right! I don't! I think reading directions is boring, so I usually just dig right in on a project and only go back and read the directions if something goes horribly wrong. I totally made up this process, and if it's wrong, feel free to correct me via comments! I'd love to learn from your expertise.


 Use a flat tool to pack it in there, then wipe it off. If you don't want to buy a tool just for this, a knife, ruler, or anything else with a flat edge will work. If the putty dries and you see some lumps and bumps that didn't get wiped off, no worries. You can use sandpaper to sand it down easily.

Part One:
These are the tools I used:
- a baby-sized flathead screwdriver
- a big-sized flathead screwdriver
- needle-nosed pliers (I think that's what they're called)
- and the tool that cuts stuff off. I guess its a wire cutter? I don't know.

This is my concentrating face.

That's my husband's hairy arm, not mine. Gloves are a HUGE help. We started off without them but quickly learned better and both put some on.
Now that you have your tools, gloves, and your concentrating face ready, I recommend starting with the smallest part .. the arms of the chair. That way you get an idea of what you're in for before the chair/couch is too far gone. You'll want to wedge the baby-size screwdriver under the nailhead, wiggle it out a little, then do some more wiggling with the bigger sized screwdriver. Then grab the nailhead with the pliers and pull it the rest of the way out. Some of them practically fall out once you get the screw driver under there, and others still needed to be pulled out.
For the staples you'll want to repeat the same steps, but you probably won't need both sizes of screws to get it out .. just the little ones. If it breaks off and leaves a staple sticking out, use the wire cutter to trim it down so you don't stab yourself with it later.
Repeat this all over the whole chair. It will probably take hours, even if there's two of you working on it. Remove the fabric and stuffing as you go, but two things to remember .. and these are VERY, VERY IMPORTANT...
1. Don't throw away the nails!
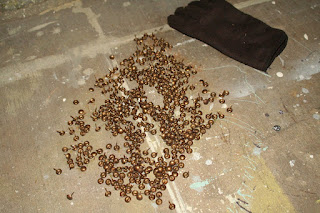
Put all the nails in a bowl or bucket as you pull them out. Once you're done pulling all the nails out, separate them into groups so that you can go back and count them without having to worry about losing count after you've already gotten up to 342! I chose to put them groups of ten.
Here are my little groups of ten, with one last group on the bottom right only having five. I actually found three more nails as I was sweeping up, so now I know that to replace these (they were too bent and messed up to be re-used) I'll need at least 478! NOW you can throw them out ... just make sure you write down your number first.
The second big important thing?
2. Don't throw away the fabric!
Don't tear up and especially don't throw away the fabric from the chair. You'll want to use it as a pattern for cutting out the new fabric, and if you throw it away it's going to be MUCH more difficult to know how to cut out the new fabric. So throw away the stuffing, but KEEP THE FABRIC and try not to rip it to shreds!

Part Two:
Now you're down to the chair bones! Wipe it down really well ... it's probably gonna be pretty grimy by now.
You'll want to buy some Plastic Wood. It's fairly inexpensive, and if you're doing small projects like furniture, it should last you awhile. You can get it at Home Depot or just click here to order some. You'll use this to fill up all the holes left by the nails and staples.
 Use a flat tool to pack it in there, then wipe it off. If you don't want to buy a tool just for this, a knife, ruler, or anything else with a flat edge will work. If the putty dries and you see some lumps and bumps that didn't get wiped off, no worries. You can use sandpaper to sand it down easily.
 And that's part one and two of four steps to a newly upholstered chair. Stay tuned!

0 comments ... click to leave a comment!:
Post a Comment
Yay! I LOVE when people leave comments:) I seriously get excited over every single one.
I reserve the right to delete your comment if you are being a meany-meany-poopie-head.